windows中caffe_ssd编译python35的接口

参考博客:
https://blog.csdn.net/thecentry/article/details/90318360
https://www.cnblogs.com/xuanyuyt/p/9772819.html
准备工具:
vs2015
anaconda中建一个python3.5的虚拟环境
cmake(3.4以上的版本)
本文编译的是cpu模式的caffe-ssd
***下载caffe-ssd-windows的源码
https://github.com/runhang/caffe-ssd-windows
***下载caffe所需要的第三方库
https://github.com/willyd/caffe-builder/releases/download/v1.1.0/libraries_v140_x64_py35_1.1.0.tar.bz2
下载的库文件:
解压后是文件夹
***修改caffe-ssd-windows工程中的编译选项
修改文件./caffe-ssd-windows/scripts/build_win.cmd
第24行开始:
    if !PYTHON_VERSION! EQU 2 (
        set CONDA_ROOT=D:\Develop\WinPython2.7\python-2.7.10.amd64
    )
    :: Set python 3.5 with conda as the default python
    if !PYTHON_VERSION! EQU 3 (
        set CONDA_ROOT=D:\Anaconda3\envs\pytorch_35
    )
    set PATH=!CONDA_ROOT!;!CONDA_ROOT!\Scripts;!CONDA_ROOT!\Library\bin;!PATH!
指定python3的环境路径,上面python2的路径不用管它。
第160行开始:
cmake -G"!CMAKE_GENERATOR!" ^
      -DBLAS=Open ^
      -DCMAKE_BUILD_TYPE:STRING=%CMAKE_CONFIG% ^
      -DBUILD_SHARED_LIBS:BOOL=%CMAKE_BUILD_SHARED_LIBS% ^
      -DBUILD_python:BOOL=%BUILD_PYTHON% ^
      -DBUILD_python_layer:BOOL=%BUILD_PYTHON_LAYER% ^
      -DBUILD_matlab:BOOL=%BUILD_MATLAB% ^
      -DCPU_ONLY:BOOL=%CPU_ONLY% ^
      -DCOPY_PREREQUISITES:BOOL=1 ^
      -DINSTALL_PREREQUISITES:BOOL=1 ^
      -DUSE_NCCL:BOOL=!USE_NCCL! ^
      -DCUDA_ARCH_NAME:STRING=%CUDA_ARCH_NAME% ^
      -C "D:\caffe-builder\build_v140_x64\libraries\caffe-builder-config.cmake" ^
      "%~dp0\.."
指定了第三库的路径,这个libraries的路径可以自己指定。
第70行开始:
    :: Change the settings here to match your setup
    :: Change MSVC_VERSION to 12 to use VS 2013
    if NOT DEFINED MSVC_VERSION set MSVC_VERSION=14
    :: Change to 1 to use Ninja generator (builds much faster)
    if NOT DEFINED WITH_NINJA set WITH_NINJA=0
    :: Change to 1 to build caffe without CUDA support
    if NOT DEFINED CPU_ONLY set CPU_ONLY=1
    :: Change to generate CUDA code for one of the following GPU architectures
    :: [Fermi  Kepler  Maxwell  Pascal  All]
    if NOT DEFINED CUDA_ARCH_NAME set CUDA_ARCH_NAME=Auto
    :: Change to Debug to build Debug. This is only relevant for the Ninja generator the Visual Studio generator will generate both Debug and Release configs
    if NOT DEFINED CMAKE_CONFIG set CMAKE_CONFIG=Release
    :: Set to 1 to use NCCL
    if NOT DEFINED USE_NCCL set USE_NCCL=0
    :: Change to 1 to build a caffe.dll
    if NOT DEFINED CMAKE_BUILD_SHARED_LIBS set CMAKE_BUILD_SHARED_LIBS=0
    :: Change to 3 if using python 3.5 (only 2.7 and 3.5 are supported)
    if NOT DEFINED PYTHON_VERSION set PYTHON_VERSION=3
    :: Change these options for your needs.
    if NOT DEFINED BUILD_PYTHON set BUILD_PYTHON=1
    if NOT DEFINED BUILD_PYTHON_LAYER set BUILD_PYTHON_LAYER=1
    if NOT DEFINED BUILD_MATLAB set BUILD_MATLAB=0
    :: If python is on your path leave this alone
    if NOT DEFINED PYTHON_EXE set PYTHON_EXE=python
    :: Run the tests
    if NOT DEFINED RUN_TESTS set RUN_TESTS=0
    :: Run lint
    if NOT DEFINED RUN_LINT set RUN_LINT=0
    :: Build the install target
    if NOT DEFINED RUN_INSTALL set RUN_INSTALL=0
这块区域,指定一些宏,因为我的电脑上没有gpu,所以编译的是cpu模式的caffe-ssd。
***生成vs工程
在命令行中,运行caffe-ssd-windons/scripts下的build_win.cmd


如果工程的配置选项没有问题,该命令会调用cmake,在/caffe-ssd-windows/scripts/build/下生成vs2015的工程。
***编译caffe-ssd
在上一步中,build_win.cmd命令会继续编译caffe的工程,有报错
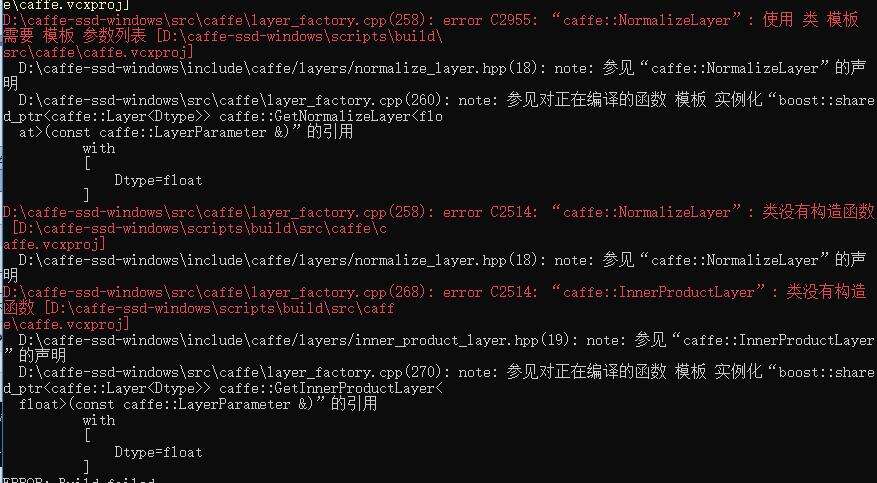
问题出在NormalizeLayer和InnerProductLayer这个两个类上。
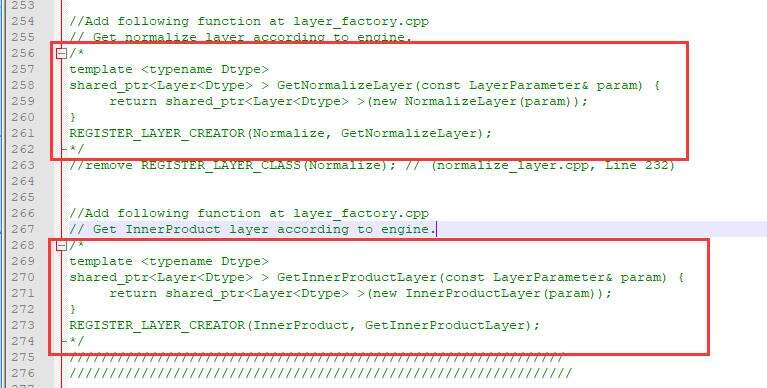
打开/caffe-ssd-windows/src/caffe/layer_factory.cpp,屏蔽掉报错的这两段函数:
用vs2015打开生成的caffe.sln解决方案,release_x64模式下,先编译caffe,不出意外的话,能够编译成功。
然后编译pycaffe,编译成功后,可生成/caffe-ssd-windows/python/caffe文件夹。

***import caffe
将上一步中,编译成功的caffe文件夹,拷贝到site-packages中。
以我自己的python虚拟环境,为例:D:\Anaconda3\envs\pytorch_35\Lib\site-packages
安装caffe,必须的库,protobuf,scipy,scikit-image,即可import caffe成功。
